Nut compensation
This is the last installment of my trilogy containing the "composite saddle bone", the "spruce bridge plate" and now the "nut compensation". These three things works in harmony on my restored old guitars and to my ears gives them a way better sound than expected :-)
Intonation is a field with many theories and opinions. Here I describe a practical way to use the nut and not just the saddle to improve intonation on any fretted instrument. The information found in the site setitupbetter.com is the base for the method.
To use the nut for intonation purposes gives the possibility to have almost "perfect" intonation on two different spots on the fretboard. With standard intonation the intonation will be great at the 12'th fret only. The intonation in the upper fret area of the fretboard are really bad indeed. Incidentally, that's where the majority of all guitar players play their chords ;-)
The main problem is that all fretted notes have a higher pitch than the open strings due to the stretching of the fretted strings. Another major problem is the need to have the nut a bit higher to avoid fret buzz from open strings (they are longer, vibrates more and are often played harder than fretted notes, back buzz behind a capo is another problem). Chords with a blend of fretted notes and open strings will sound out of tune with the standard intonation, especially the chords taken near the nut.
After reading the info on the site mentioned above, I came up with a way to measure the intonation points in the nut and the saddle. Using the measures I then cut the fingerboard shorter (around 1 mm shorter) at the nut and use a dremel and files to shape the nut and saddle so the string leaves the nut/saddle at the measured intonation points.
I use a stroboscope tuner and use it to make sure that the open string, the fretted third and 12'th notes on each string is in tune. I do this by moving the intonation points at the nut and saddle to a forth (retuning after every movement) until the equation is solved and all the three notes on the string is in tune. The positions are measured and written down.
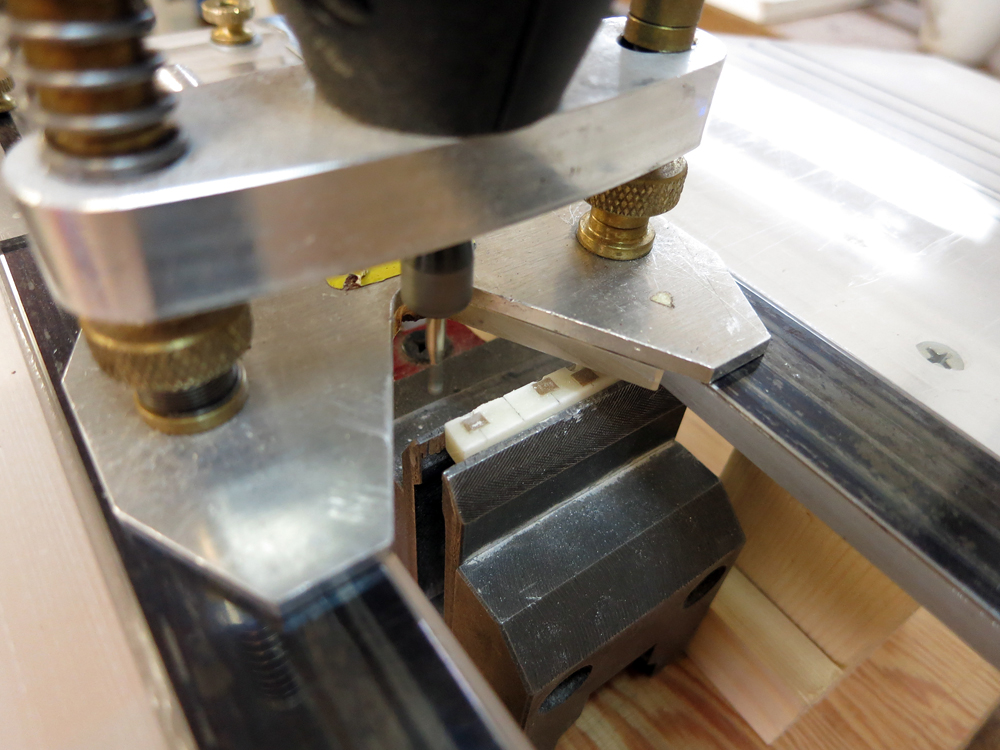
While measuring, the "nut" consists of small bits of tangless frets acting as an adjustable "zero fret" and the "saddle" is the back ends of drills rolling on top of the bridge. A temporary tailpiece is used to fasten the strings. A small piece of spruce is used to make the fretboard a bit longer at the nut to make room for the movable frets, a 0.15 mm feeler gauge gives the "nut" a bit more height to emulate the optimal string height at the 1'th fret. Another piece of spruce is needed to fill out the saddle slot if there is one.
 It's easier on an electric guitar, no need for a tailpiece and drills.
The final intonation points on the electric guitar above. Small compensations on the nut was needed on this one, but I had to extend the width of the nut about 1 mm closer to the 1'th fret.
I measure the distance from the back side of the 1'th fret to the middle of the "zero" fret for each string with a digital caliper and the distance from the same backside of the 1'th fret to the intonations point at the saddle with a ruler. I put the measurements in a table (mm and cm).
It's important to check the string height at the 12'th fret, it shall be the one used when playing. For the electric guitar I use a standard 2,5/1,5 mm between the top of the fret to the underside of the string. Having the stringset that the player likes and will use is another good thing to make the intonation as good as possible. The tuning shall be the one most used when playing. The fretboard should have the right relief too. In a nutshell, all the setups and choices should be done before the measuring for intonation.
By cutting the fretboard shorter at the position for the intonation point closest to the 1'th fret, the nut can be rectangular and all the other intonation points can be reached with a dremel. The nut looked like this when cut. Only with a close inspection of the nut you will notice the jagged cuts.
Not a great example, the G and D came close and I decided to leave both of them uncut when measuring the nut blank on the guitar... I should have cut in 0.16 mm on the G string...
Every guitar have small variations of the intonation points. There is no "one size fits all".
On acoustic guitars I have noticed though that it's the A or b strings that usually comes closest to the 1'th fret. At the saddle the strings G-e is often a straight line and the E-D strings can vary a lot. The electric guitar example above is not typical, the variations at the nut is usually bigger.
I made a special tool to shuffle the fret bits at the nut like this.
 I found a drill bit set with drills in steps of 0.1 mm between 6 mm to 0.1 mm. Very handy to adjust the string height at the 12'th fret with a radiused fretboard. I mark the position of the intonation point on the nut blank with small bits of tape to make it easier to cut in to the right spot.
 I made a jig for the Dremel using my modified version of the Stewmac saddle slot jig.

 Here is the finished nut, a rather typical one for an acoustic guitar.
 Doing a nut compensation like this makes the guitar chords near the nut play beautifully in tune. I believe that even a capo will play better since the saddle is only intonated for fretted notes (as the capo is) instead of a blend of fretted notes and the problems at the nut!
Without a nut compensation, every fretted instrument WILL be out of tune when playing chords near the nut. The difference is is a major one.
The nut intonations is quite stable. The intonation is very good even when a different set of string gauges or alternative tunings are used. I for one is not as sensitive to pitch as the stroboscope tuner is! On an electric guitar it's always a good thing to intonate the "good old way" for the new set of strings, that will make the guitar play cleaner in the lower part of the fretboard. There are always variations between different sets of the same string brand, but most of the time the difference is small.
The measuring process usually take me one hour. Making the compensated nut and composite saddle another couple of hours. All in all, it's about a half a days work if nothing goes wrong. The upside is the result obviously, but the measurements also makes it impossible to cut the saddle slot in the wrong position :-)
Views: 10871
Replies to This Discussion
-
Permalink Reply by Hesh Breakstone on
-
You can go WAY further down than you have as mentioned and also as mentioned any need or perceived need for nut compensation goes increasingly away when we cut nut slots properly.
Not everything in Lutherie is a number or spec either. How far we take nut slots would be very difficult to measure because at times we are only seeking the tiniest sliver of light between the bottom of the string and the fret crown. David can explain this far better than I can.
Roger I also have to take issue with something else that you said. Above you said that "Customers are easily pleased."
That's not my experience and I would also caution that some folks might even consider this disrespectful to the clients that we are fortunate to have. In my experience clients are often, not always.... correct and even if they may not assign proper causation, something even so-called experts often suffer from.... they remain correct that something is indeed wrong.
From the player with a Robin Hood fetish who likes to pull the strings out 6" like a bow and arrow to the guy with the lightest touch who can play action of 2/64th" and 3/64" my customers have always played an important roll in my own Lutherie education. It was however ultimately up to me to keep an open mind that it's just possible that I can learn things from anyone and everyone.
Some folks will want what they want because some Internet charlatan planted the idea in their heads while others will want what they want because they actually understand the issues.
With all of this said in my experience customers are not easily pleased nor should they be summarily dismissed as having their heads up their behinds. This level of arrogance is dangerous when one provides a service and wishes to be successful in the marketplace.
These days with excellent imported instruments that can be had for very little money increasingly what old-world Luthiers charge for certain more involved services is becoming less and less economically feasible. Or, in other words who wants to pay $600 to properly reset a neck, fret work, new nut, etc. on a $500 guitar....
With this in mind if we are to continue to provide real, measurable value to and for our clients in my view job one starts with respecting them enough to not only listen to them but to really make the effort to "hear" them....
With this said in my experience customers are not easily pleased nor should they be.
-
Permalink Reply by Roger Häggström on
-
What I actually tried to say was that the intonation in factory made guitars is never any good and it's easy to make it (way) better and impress the customer with the improvement. Without doing everything you actually can do. Should have phrased it better, sorry...
Well. I will do some experimenting the next time. I will measure the actual action with a zero fret and use it as a base line for the string height at the 1'th. Seems like the advice on the net for this is way off...
I do ask people how they play, but most of the time I don't have them in my shop so I can study them while playing. I adjust the string height slightly according to their reported playing style at the 12'th.
-
-
As a side note, the spruce bridge plate and the composite saddle bone I've described in another post is very good for reducing the wolf notes. The stiff maple bridge plate and the stiff solid saddle bone seems to enhance them.
-
-
A spruce bridge plate would wear very quickly and encourage the string balls to start migrating up the pin holes. This can lead to a bridge plate splitting along the pin holes resulting in an unlevel surface for the bridge to be glued to and subsequently the bridge can lift.
We frequently see lifted bridges and whenever I do I look inside and it's frequently the case that bridge plate issues contributed. This is yet another reason why bridge plate material should be stiff enough and properly oriented to maintain the shape of the dome, if any and resist abrasion from the string balls.
I would not use a spruce bride plate on a steel string guitar.
-
-
Look at my post about this. I use a small piece of really hard wood around to holes to cope with the string balls. It's not all spruce I have to admit :-)
-
-
The guitar I'm working on right now, a Levin from 1930, was a good candidate to check out the lowest possible action at the 1'th fret using a zero fret. I must say that I'm surprised how low the strings are without string buzz playing medium hard. A little buzz when I play hard, but not much.
The measures:
Mensur: 63 cm
Relief: 0.05 mm
Radius: 10"
Strings: Newtone Masterclass 0.11
Action 12'th fret
E: 2.3 mm
e: 1.3 mm
Action 1'th fret
E: 0.35 mm
A: 0.35 mm
D: 0.30 mm
G: 0.25 mm
b: 0.20 mm
e: 0.10 mm
The numbers given by feeler gauges between the fret and the underside of the string. I guess I should add another 0.05 mm to the measures at the 1'th fret. I will continue and do the compensated nut measures tomorrow.
BTW, Levin made very strange guitars a couple of years around 1930. Very beautiful and nice instruments, but with a insane string height, especially on the bass side. On this one I put a wedge under the fretboard, 2 mm at the end to increase the string height to squeeze in the bridge under the strings. I probably lowered the bridge 5 mm or even more. The original setup was way, way to high!
-
Permalink Reply by Robbie Collins on
-
Thank you for the excellent photo essay.
My experience is that if a nut is property cut, strings are as low as possible at first fret short of buzzing, strings at the 12th fret are likewise as low as possible considering the players style, and intonation at the bridge is properly set, that intonation problems will be minimal. IMHO, there is no getting around the guitar's equal temperament other than tuning differently for each scale and fingering position. A good player can also compensate flat notes with additional string pressure or bending. Vibrato can disguise sharp notes.
-
-
Thanks. A agree with everything you said! But I do think that a nut compensation will add to the intonation, especially for chords close to the nut. But you know that already :-)
-
-
Se here is the results from my experiment. Used a couple of hours measuring the nut twize with plain zero frets and the zero frets on top of a 0.15 mm feeler gauge making the "nut frets" a bit higher.
I used a medium low string height for the E/e-strings, 2,5 mm and 1,5 mm at the 12'th fret. The floating bridge had a little sag in the middle, so the middle strings was a bit low. Not perfect, but the same for both measurements. The measured string height at the 12'th was
E: 2,5 mm
A: 2,4 mm
D: 2,1 mm
G: 2,0 mm
b: 1,6 mm
e: 1,5 mm
As I described I move the "nut fret" and/or the saddle bone (in this case the whole floating bridge) intonation points for each string until I get a clean tone on the open string and the fretted 3'd and 12'th. I move one of the intonation points, retune, check that the other strings are in tune and see if the Strobe tuner gives me the result I want. There is but one solution to the equation. When all the notes are clean, I measure the distance from behind the 1'th fret to the "zero fret" and to the "saddle bone".
BTW, I chosed the 3'd fret instead of the 2'th fret to keep a healthy distance from the stiffening effect of the string at the nut. But still in the range of most common chords.
When done the 3'd and the 12'th fretted notes are intonated close to perfect. With the frets on the fretboard placed for equal temperament, chances are that all the fretted note in between 3'd and 12'th are close to perfect too. The frets above the 3'd and below the 12'th may drift in intonation in small incremental steps. The open string match the fretted 3'd and 12'th and also all the other well intonated fretted notes. Any fretted strings and open strings are thus in harmony in any chord. That's the theory and method.Here are the results, the last two measures from behind the 1'th fret.
Zero fret, 1'th fret heigh, distance to nut, distance to saddle
E: 0.40 mm, 35,12 mm, 60 cm
A: 0,40 mm, 33,62 mm, 59,3 cm
D: 0,30 mm, 35,87 mm, 59,85 cm
G: 0,25 mm, 36,16 mm, 59,7 cm
b: 0,35 mm, 33,84 mm, 59,7 cm
e: 0,15 mm, 35,06 mm, 59,5 cm
0,15 mm feeler gauge under zero fret, 1'th fret height, distance to nut, distance to saddle
E: 0.55 mm, 35,49 mm, 60,1 cm
A: 0,55 mm, 33,78 mm, 59,4 cm
D: 0,45 mm, 35,63 mm, 59,80 cm
G: 0,45 mm, 36,02 mm, 59,7 cm
b: 0,40 mm, 33,90 mm, 59,6 cm
e: 0,30 mm, 34,91 mm, 59,5 cm
In the picture you can see the final position of the" nut frets" for the two (completely) different measurements.Some conclusions.
* The added feeler gauge thickness added about the same amount to the string heigh over the 1'th fret. The difference may be a not so smoth removal of the tang on the pieces of frets or simply different assessment of the feeler gauges.* The pattern for the compensation of the nut and saddle for this guitar, this mensur, these strings, this shape of the floating bridge, this freboards very small relief (0.05 mm), this string height at the 12'th and everything else the same between the two measurements was very similar indeed!
* The intonation point for the A string at the "saddle bone" is radically different to the E and D strings. The G-e strings are rather straight. This behaviour is very common when I do the nut intonation (in fact that was the start of the "composite saddle bone", I need a thick saddle bone about 4 mm to reach all the intonation points. I tried to make the soid bone lighter).
Well. I'd say that the string height over the 1'th fret is not that important for the nut compensation using my method. It looks like even a very low setup with the standard intonation method in the best possible way will benefit from a nut compensation. If in fact my theory and method is valid. The positioning of the frets on this Levin from 1930 is good, but not perfect. Next time I have a new fretboard with all the frets in the right spot I will test the tuning of the individual fretted notes between 3'd and 12'th to make sure they are as good as I think they must be (the relief may change the pitch).:-)
-
-
Correction.
Zero fret, 1'th fret heigh, distance to nut, distance to saddle
E: 0.40 mm, 35,12 mm, 60 cm
A: 0,40 mm, 33,62 mm, 59,3 cm
D: 0,30 mm, 35,87 mm, 59,85 cm
G: 0,25 mm, 36,16 mm, 59,7 cm
b: 0,25 mm, 33,84 mm, 59,7 cm
e: 0,15 mm, 35,06 mm, 59,5 cm
-
-
Another way to see this method is that we have two places on the fretboard with very good intonation instead of only one as with the standard method. The area inbetween, above or beyond the two spots with great intonation will change to the worse (probably) in small incremental steps.
-
Permalink Reply by steven gallagher on
-
You compensated the bridge and nut to make the open string, the 3rd, and 12th frets exactly in tune. In my experience, any other fret could be sharp or flat with no rhyme or reason. I assume frets cannot be placed or crowned accurately enough to prevent these small errors.
If you really wanted to maximize the number of angels dancing on the head of a pin, you could compensate the bridge using the 3rd fret and for the other fret, pick the median value from frets 12 through 16. Then compensate the nut.
© 2024 Created by Frank Ford.
Powered by
![]()