End block crack - how to fix the outside?
Apologies for starting another thread about end block cracks. I managed to derail the old one with too many questions, so I decided to start a new thread.
My Guild F30's end block is cracked, along with a crack on the outside, of course. It's what seems to be a classic example of this type of crack, as shown here. Frank's page is very clear, however, I'm not sure how you glue the outside.
It seems like both sides need to be done at the same time. The procedure I'm thinking of would be to get titebond on the crack from the inside, the brush some hot hide glue on the outside. Clamp the top and bottom above the crack, then clamp the crack from the inside out, as shown in this picture:
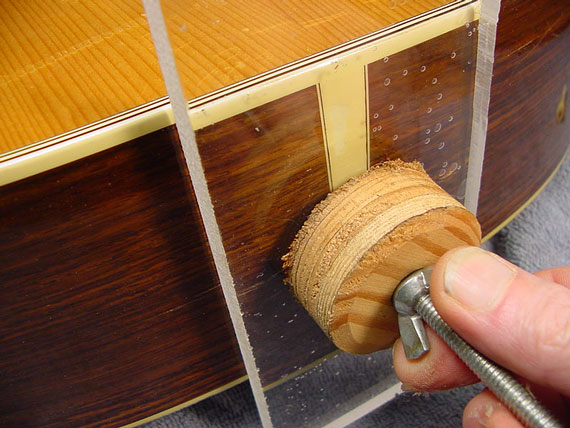
The only thing I'm worried about is that I'm first clamping the top and back, and I feel like I would need them to be able to "bend" in order to clamp the end block properly.
What's the proper way of gluing and clamping the outside crack?
(To be clear, when I say inside I mean this, and by outside I mean this)
Thanks!
-Eliya
P.S. I was at Gryphon last week for the first time. Great store!
Views: 2757
Replies to This Discussion
-
Permalink Reply by Ned Knepp on
-
Eliya,
I think it's possible that you still have some glue in the crack that won't allow it to close completely, That's one of the reasons that you're going to install a patch over the block.
Personally, I don't think you need the spool clamps. They are applying most of their pressure on the back edge of the block, not down the center. I think it would work better if you keep the bar clamp you have in the center and put one on each side of that one, over the ends of the block. I would use a caul between the wood and the clamps to spread their force out a bit more. Since the top and back are glued to the block, you can shift the clamps a bit closer to the sound hole to keep the clamping force more vertical on the block.
-
Permalink Reply by eliya on
-
Thanks, Ned! You nailed it! I put an acrylic caul on the top and back, and clamped with two more bar clamps and the crack closes up nicely (see picture, if you're interested).
I really appreciate all your help throughout this thread.
- Attachments:
-
-
 IMG_20140924_194104.jpg, 1.8 MB
-
-
-
Hey Ned, I'm updating because I know you're interested. I Glued it up Thursday night. and ended up not using the acrylic cauls because another dry test showed that the bar clamps were enough to close the crack.
Here's a picture of the end block glued together with the supporting patch. You can't see the crack, so I think it came out pretty well, especially for a first time. I also did what Frank suggested by wetting the top and bottom of the patch so it won't curl. I tested with a .002" feeler gauge, and couldn't get it in the seams. Although the patch is Mahogany, like the sides and block, it doesn't match the color, but I'm not too worried about it; it's on the inside.
Thanks again for your help and having my back a few pages ago. Also, thanks to everyone else who chimed in. I think it all worked out fine.
- Attachments:
-
-
IMG_20140927_210741.jpg, 1.7 MB
-
-
-
Thanks! Yeah, it feels pretty great. Now to glue the cracks on the sides, splint them, and drop fill!
-
-
-
Back with more questions about fixing the cracks on the either side of the block.
Ned, you mentioned superglue, and I wonder why superglue and not hot hide glue? I'm thinking hhg for two reasons. The first is reversibility, even though I've never heard of reversing a side crack repair. The second is that I want to use lacquer for the drop fill and not superglue. It'll be easier for me to stain the lacquer to match the current stain.
Lastly, how should the splinting be done? I see two ways: One is to have a series of small splints along the crack, and the other would be to have one splint, perpendicular to the grain, at the end of each crack. Seeing as this crack isn't going to move a lot, nor is it a high stress area (i think), I believe the second splint would be enough.
-
-
-
My choice for splinting would be to use several small blocks. The placement of the blocks can be centered on the crack no matter how much it may deviate from straight and it's much easier to place several small patches than it is to bend one long one to conform to the curve in the side.
I was suggesting CA because the thin version will wick into even the smallest crack so you can be pretty assured that it will get everywhere. I do support the use of hot hide glue on long, fairly open cracks where things will need to be clamped up to bring them back into alignment but prefer CA for tight well aligned cracks. The CA also a very good "fill" for the finish since it dries clear and, in the process, turn the white finish cracks to clear as well. Once cured, it's hard enough to buff to a shine.
I don't know what you need to color match. I haven't gone back to look at the original thread but I though the exterior crack was tight with only discoloration where the finish was cracked.
I've been thinking about your journey into repair work. I don't know what you have in the way of a personal library but I would like to suggest that, if you haven't already done so, you start collecting books on the subject. I have a shelf of books that are my reference library. It's not large but it covers building, repair, and design as well as pure documentation, I'm always on the lookout for another reference book to add to the collection. The one thing I want to emphasize is that they need to be read to be of any value.
-
-
Thanks, Ned. First, my apologies, I meant cleat and not splint. I keep getting the two words confused. Anyway, by one cleat, I meant something like this one, to prevent the crack from ever trying to spread:
http://www.frets.com/FretsPages/Luthier/Technique/Guitar/Structural...
I want to color match because I'd like the crack to be invisible from the outside, or at least as invisible as possible. The superglue will seal the crack and I'll be able to scrap and polish it level, but it will leave the crack visible.
As far as luthiery library, it's funny you mentioned it, because I was going to start a thread for that. Frets.com is my main source because it has pretty much every type of repair, it's easy to search, and it has pictures in color. As far as books, I own Dan Erlewine's Guitar Player Repair Guide, and Hideo Kamimoto's Complete Guitar Repair. The latter is very terse, so I don't use it very often. Both frets.com and Dan Erlewine's book are great resources for the how, but not always for the why. I like knowing why things are done a certain why - why clamp it one way and not the other, why use a certain type of glue, why use one cleat instead of several and vice-versa, and so on. Once I know the why for several repairs, I can extrapolate and figure out other repairs on my own. Just the way my mind works.
Ok, so all this long-winded explanation is really just my way of saying that I would love to find some more books that talk discuss properties of wood - from being able to tell what type of wood I have just from looking at the grain, to figuring out how much pressure or force it can take (which I assume is a function of its density, size, and thickness). I will also benefit from understanding the architecture of acoustic guitars better, from how the top and back interact, the neck-body joint, why braces are placed where they're placed, and so on. I'm a little hesitant with acquiring every luthiery book I see, because the few I ran into don't go into the why. So if you have any books you recommend that will satisfy this need, I'm all ears.
-
-
I understand the splints you are talking about. This is something that I always add to the inside of any guitar I work on that is; (1) open so I have access and (2) missing them. Adding them to the inside of a closed guitar is a lot more complicated. I suppose it isn't too hard to make a couple for each side of the tail block but I think smaller patches will work fine if the crack is well aligned and closed.
As I said, I don't remember what the exterior crack looks like. I thought it was closed and tight. If there are areas of discoloration because of missing wood or finish that I don't remember, I can understand needing to match the color.
My book collection, while small includes both of the "Teeter" ( Don Teeter) Guitar repair books which are dated but contains plenty of basic repair information that is still functional. You can get paperback copies of them on the Internet for around twenty dollars each. I have Kamimoto's book too as well as a couple of others that I can't remember off the top of my head. I have Erlewine’s book on finishing and the book on Gibson "Flat Top" Acoustic guitars that he co-authored. I have some books that contain tips and tricks on repair, building, tools and even the business side of things. They are the two “Trade Secrets” compilation from Stew Mac and the two “green” books from GAL. I also have a “catalog” from LMI that was published in 1998 which is the oddest catalog I’ve ever seen because it contains hundreds of pages of articles on a lot of different aspects of the instrument business. I don’t know how available this particular catalog is today but the other books are easy to find.
Besides these, I have books on building instruments as well. They cover mandolins and archtop guitars as well as classical and flat top steel string guitars. I have more focused books on inlay work, and various other more specialized material, some of which are completely unrelated to guitars.
General reference books include the book on Gibson "Flat Top" guitars that I mentioned before and a copy of Mike Longworth’s reference book on Martin instruments both of which are amazing in the amount of information they contain on the brands. I also have Gruhn and Carter’s book “Acoustic guitars & Other Fretted Instruments” which is, I think, a very good reference for instruments you may not see so often.
Maybe the biggest surprise to me was how much I've learned from various "Coffee Table Books" that friends and family have passed to me because I'm "into guitars". I didn't take the first couple of them very seriously but I've used them several times for the high quality photography. It turns out that there is a LOT to learn from the details available in these quality pictures. Some of them actually have a lot of good information in the captions and text too. I guess the lesson I learned is that good information can even been found in “fluff”.
I think the books on construction are as important as the books on repair. In some cases they are more useful. Having an idea of how repair is done is important but the truth is that part of the “job” is inventing a way to accomplish what needs to be done. What the construction books have done is give me reference on the details of building that are not always apparent. The truth is that you usually need to understand how the instrument was built in the first place to be able to figure out how to repair it. Sometimes it's nice to be able to see what some of the builder books have to say on how a part is made and even where it fits into the building process to understand how to repair or replace it.
Besides the books, I also keep pictures and other reference material I come across on the Internet in a (LARGE) folder on my computer. The contents are also backed up to an optical disk as well. It contains a very eclectic collection of “stuff" and I find myself digging in it all the time.
There are books that I want to add and will over time. I intend to start adding the "Red" books from GAL soon and I've come across other books that I would like to add but found them a bit too pricey at the time. I keep them in mind as future additions. One book on the early years of Gibson with a really good collection of early photos is in our local library but there isn't any way to "reserve" it if/when it is scheduled to be removed so I just check periodically to see if it still in the catalog. Thinking about it now, I haven’t asked about the possibility of reserving it for a few years so maybe it’s time to ask again. It’s possible that I can get it if it’s not showing much use now.
Anyway, I have other material I keep that ranges from loose pages to plans that are in folders, envelops and binders that pretty match the computer folder in scope. I have a few old catalogs that I keep as a reference source to help identify the occasional aftermarket part when I come across it as well a couple of books dealing with electric guitars and other areas that I haven't delve into much.
This all sounds like a lot when I read over this but it all fits on a thirty inch shelf in one of my book cases. Some of it I only look at once in a while, as needed but some, like the "tip and tricks" stuff I will pull at random just to see what may be relevant to me now that wasn't before. It's amazing how often I find something that I would swear wasn't there last time I looked.
It's not something that you need to spend a lot of money right away, I pickup books on Ebay or other places that are cheap every so often. Some have been of pretty limited use to me but then I usually haven't payed much for them anyway and the ALL add to my knowledge in some way.
Maybe the most important thing to remember is that they are all useless if you don't actually read them. Even the long construction books can add a significant amount to your knowledge and you can never tell what boring part will help you find an approach to a tricky ( to me anyway) repair.
It's already too long so I'll stop, I have some thoughts about learning about building and repair that I'l save for another post in the future.
- ‹ Previous
- 1
- …
- 3
- 4
- 5
- Next ›
© 2026 Created by Frank Ford.
Powered by
![]()