End block crack - how to fix the outside?
Apologies for starting another thread about end block cracks. I managed to derail the old one with too many questions, so I decided to start a new thread.
My Guild F30's end block is cracked, along with a crack on the outside, of course. It's what seems to be a classic example of this type of crack, as shown here. Frank's page is very clear, however, I'm not sure how you glue the outside.
It seems like both sides need to be done at the same time. The procedure I'm thinking of would be to get titebond on the crack from the inside, the brush some hot hide glue on the outside. Clamp the top and bottom above the crack, then clamp the crack from the inside out, as shown in this picture:
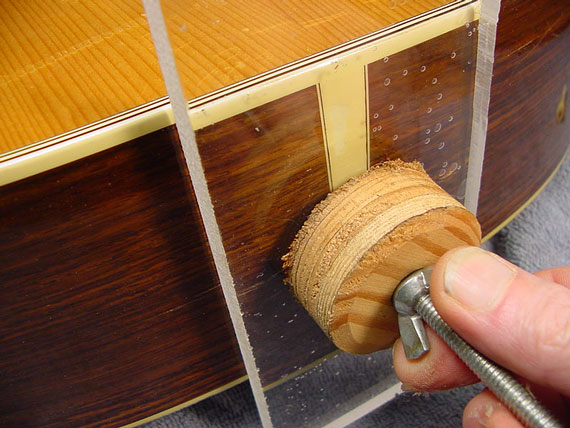
The only thing I'm worried about is that I'm first clamping the top and back, and I feel like I would need them to be able to "bend" in order to clamp the end block properly.
What's the proper way of gluing and clamping the outside crack?
(To be clear, when I say inside I mean this, and by outside I mean this)
Thanks!
-Eliya
P.S. I was at Gryphon last week for the first time. Great store!
Views: 2870
Replies to This Discussion
-
Permalink Reply by Ned Knepp on
-
If this were mine to fix, I don't think I would mix glues in this way.
My thinking, without actually seeing the guitar, is that the block is the primary repair. Without getting a stable repair there, the exterior crack repair will be at risk. What I would probably do is focus on the block crack so that I can make the outside crack stable before handling it. I would only include the exterior crack if it was particularly splintered and misaligned. If this is the case it may be beneficial to be able to flex the exterior crack too, not something that can easily be done after the block is solid again. If the exterior crack is clean enough and well enough aligned to wait, I would approach the block as one repair and the exterior crack as another.
I'd probably use titebond for the working time on the block and follow Frank's advice about flexing the interior crack open enough to get lots of glue into it. If I was doing both cracks at the same time I'd also use titebond for the exterior crack with wax paper between the clamp caul and the body. Ideally, you would be able to get glue deep enough into the crack(s) to insure that it is completely glued with none of the crack(s) remaining dry. It may or may not happen but an attempt at this would probably mean a bit of a mess.
If the exterior crack is fairly clean and in good alignment and I chose to approach it as a secondary repair, I'd think about using CA for this repair which has the added benefit of sealing he finish and could even be used to fill the finish over the crack. It would all depend on the condition of the crack. If it doesn't have a lot of alignment problems, CA is pretty go at holding these sorts of cracks. Even if there is some splintering, CA works fine as long as the splinters can easily be held in place until the glue dries. I've found that dental picks, the type with thin, sharp tips work well in holding small pieces in place until CA dries. The fine point tends to not have enough surface area to get stuck to the wood but is stiff enough to apply good pressure. Anyway, only you can determine what will work best.
I should issue a caveat about my advice on this. I usually only work on instruments that belong to me and I also don't much like working long distance inside of a guitar. Also, a very common component of my projects is that a lot are "basket cases" which often come to me with" free floating" part's/ panel's or previous "repairs" that are just easier to undo with an open body. The upshot of this is that I often have an open body to work with, making these sorts of repairs much easier. I'm NOT recommending that you do it this way. Alignment of the removed part( top/back) while gluing up the body and fixing finish issues makes this approach a major escalation of work and as often as not makes the difference between a repair and a rebuild. I wouldn't open a body just to glue up a tail block but I also don't have a lot of experience with this sort of repair either. Could be that I'm giving you lots of very poor advice but it's how I think I would approach it.
-
Permalink Reply by eliya on
-
Thanks, Ned. Your advice makes sense, though I still have a few questions (which I'll get to in a minute). Also, don't worry, I'm not going to try and repair this crack by removing the top, definitely not with this guitar.
The crack is very neat on the outside (and inside). It's aligned perfectly and there are no splinters. You can see for yourself here. It's also very stable in the sense that it looks exactly the same way it did the day I got the guitar, but it also doesn't seem to budge when clamping the top. This, in fact, made me look inside the guitar again, and the "outside cracks" aren't visible on the inside. That is, the end block is cracked, but on the outside the crack spans wider than the block, yet you don't see that from the inside. A picture is worth a thousand words.
So I'm guessing the repair of the outside crack is really just filling it with glue/lacquer. Is that correct?
-
-
I'd use hot hide glue for such a repair. Mix it thin, and warm the block well before applying glue. Then quickly apply sufficient clamps.
If the crack is too tight to get good glue penetration then I'd use thin superglue instead.
Jim
-
Permalink Reply by John on
-
Do what Need says and then add an 1/8" wood plate with the grain running perpendicular to the end block. I'd probably add a cleat to the sides on either side of the endblock as well.
-
-
Thanks, John. I plan to add a wood plate, although I don't know where I can source Mahogany, or what would be a good substitute.
Also, I don't know if you saw my reply to Ned, but it seems that the side cracks don't go all the way to the inside, so I wonder if it's necessary to add cleats there.
-
-
Any hardwood will do it's a structural thing that will have no affect on sound. It doesn't even need to cover the whole endblock an inch on either side of the crack would do the job. This maybe why Larrivee uses plywood for their end blocks. The cleats are just good insurance, if the crack wanted to spread on the outside the cleats should stop it.
-
-
Good Morning Eliya,
Looking at the pictures you posted of your guitar's cracks. I think I would change my approach a bit. The interior crack appears to be both tighter and deeper than I though. I'm not sure if it will open up enough to get titebond to the "outside" side of the block. Only you can determine if this is possible but you will either need to find a way to inject titebond deep into the crack or you may need to use Jim suggestion and turn to CA for the interior crack. A lot depends on how open you can get it without making the exterior crack worse and how tightly the interior crack can be closed
The exterior crack is easily a candidate for CA as a repair/fill. It may or may not pass completely through the sides to the interior. These sorts of cracks may not show up well on the inside because they follow the grain and do not have chipped finish to define them. If you use CA for the repair, you will see it on the interior where it wicks through if the crack is complete.
The way I deal with these sorts of cracks is to line each side of the crack with masking tape, stretched tight and close to the crack on each side. The tape MUST be sealed down very well or the CA will wick under the tape and can leave a "leaf vein" pattern of glue under the tape which is absolutely no fun to clean up.You also want to carefully overlap the tape at each end of the crack for a good seal. The idea is to control and minimize the the "flow area" where the CA will be applied. You don't want to leave the tape on for long but you should probably run a line of CA and let it set up then return with another line to fill. The final outcome should leave a slight ridge on the side of the guitar when you remove the tape. It could take more but I've never needed to leave the tape on for more than a few minutes.
The ridge of CA can be shaved down with a single edge razor blade that has some masking tape wrapped over outside corner of the edge. This leaves the center of the blade available for 'shaving" but keeps the corners from digging in and will allow a final ridge about high as the thickness of the tape. The line will probably show up as a whitish line but you can then return with the polishing process of your choice to finish it up.
I use a set Micromesh pads that I purchased specifically for this sort of, small fill, repair. The set is composed of 9 double sided pads with "grit" grades starting at 1500 and going up to 12000. It doesn't really take a lot of time with these pads to get to a pretty nice "shine" and I use a bit of water to lubricate each as I work. I found it easiest to have a bowl of water available so I can touch the sanding surface of the pad to the water before I use it. I also wipe off the resulting slurry from each pad/grade before going to the next. To get a really nice shine, I finish up by polishing with Maguires brand #9 Swirl Remover. It's an automotive paint polish which is probably best sourced on the Internet. This isn't a truly cheap approach but it the best one I've found for my very small hobbyist operation. BTY, this approach CAN be used for a whole instrument... IF you have the patience and good elbows it cheaper than a buffer but MUCH more work. ( The approach I've outlined here is one of the many thing I've learned through the advice of a lot of people, most of which are here. Thanks guys!)
Edit; I also just noticed that a large part of "my" technique is actually derived from that "Fountain of repair wisdom"... Frets. com. I don't think it is possible to over estimate the impact Franks contributions to the Internet have had on the industry. Thanks again Frank.
John's advice about a patch for the block sounds good to me but I would probably make the patch as lease a long as the block even if it wasn't as wide. It would be nice if you could source wood of the same type but it's not required. In fact, John mentioned that some makers use Plywood for the blocks. In this line, it might work in your favor if you can find some 1/4 inch 5 ply plywood in one of the local "hardware" giants. This will make a patch for the block just fine.
His advice about some cross grain reinforcement of the sides on each end of the crack is right on too. Even if the cracks don't go all the way through, the wood fiber in this area has been compromised and it's a LOT easier to add some splints now than it is to find out later that one of the cracks ran further up the side.
As I said earlier, a lot of the instruments I work on are baskets cases. When the box is open I always add cross grain reinforcement to the side if it's not already there. It's a lot easier to reinforce a solid side while I have easy access, (on in the case of archtop guitars, just access.) than it is to jig up to realign and glue up a long crack that may have been contain or even prevented with some cross grain splints. Even if your sides are plywood, put in a couple of splints while you are at it.
-
-
Everything Ned said except for the masking tape, use invisible tape, ca glue won't run under it. Of course the masking tape is easier to find than the invisible tape but it's worth the extra effort.
-
-
Am I confusing the pictures of the instrument getting repaired?
The interior shot shows some sort of glue smeared along the crack to my eyes.
A previous repair or attempt at one would explain why it will not close w/ clamping.
Does it widen when the pin is pushed in further? Careful.
-
-
I see what you mean, David. I hadn't noticed that. Maybe my first question should have been to ask if the crack even moves now. Maybe it's already solid?
-
-
Oh yes, the smear. I noticed that too before and thought it's the traces of a previous repair. What's interesting about it is that it doesn't look like the remains of wood glue, or superglue. I thought it could be epoxy, but I don't think it's that.
A thin feeler gauge goes in the crack but not all the way. I assumed it gets stuck on a fiber, and didn't want to push hard so I don't break the fiber. The end pin was stuck there and I didn't notice the crack narrowing when I took it out. Granted, I only looked on the outside. I'm going to try and see what happens when I push the end pin in. Then maybe span the whole guitar with clamp and slowly tighten it to see if the crack opens.
-
-
Wow, Ned. Thanks for this thorough reply.
A few questions. Do you use the CA glue to just fill the finish or to just glue the crack, or both? Why not glue the crack with hot hide glue, and then fill it (from the outside, of course) with lacquer? When you glue the crack (not the end block crack), do you clamp the guitar from the top to the back?
The end block (along with the side and back) are mahogany). I called a lumber yard in my area earlier today and they carry it, so I'll use that to reinforce the end block.
© 2026 Created by Frank Ford.
Powered by
![]()