Finishing Curly Maple
Can anyone suggest how to finish curly maple to get a some what antique look? I'm wanting to finish a banjo rim and neck and would like to accent the curl in the wood as much as possible. Is there a recommended stain or process that works well with curly maple?
Bill Rickard
Bill Rickard
Views: 981
Replies to This Discussion
-
Permalink Reply by Jim Bancroft on
-
You could hand stain the maple with whatever color stain you would prefer, then spray shellac or lacquer to build up the proper coats. You can also add stain to the finish, then spray it on. I'd first practise on a scrap piece of curly maple to get the look you want, before doing the rim.
I built a uke out of curly maple last winter and I mixed a vintage amber stain with lacquer and sprayed it on. Looks vintage minus the nicks and scatches.
Jim
-
Permalink Reply by Jerry Mercer on
-
Bill,
I have the same question, for which I would like to get a definitive answer from someone experienced. But, in the meantime, I'm trying something: I've found that gunstock oil finish and its accompanying sealer-filler impart a nice, rich golden color to some lighter woods, but I've yet to try it on curly or birdseye maple. It also brings out the richer reds and darkens east indian rosewood toward looking more like Brazilian. I'm refurbishing an old banjo and would also like it to have a nice antique patina (but at the same time looking in excellent condition) . I'm not concerned about what any of this might do to the value of the instrument as an antique. You can get Tru-oil and the filler from a gun shop or LMI. AND its very easy to apply!
Jerry
-
Permalink Reply by Ronnie Nichols on
-
I'll take a shot at answering this. The stains you find at the hardware store and home centers usually are not strong enough to stain hard woods. The oil stains and such generally work well on softer woods but maple is pretty hard to color. The have found the powdered stains such as Stewart Macdonald and LMI sell to be excellent for curly maple. After looking in my current catalog, it appears that S.M. only sells the liquid stains now. Both these products do a good job. The liquid can be mixed with water or alcohol. My best looking finishes have come from a mixture of several colors with water. The brown, red and amber can be mixed together to get a rich, looking color. As someone already stated, you need some sample pieces to practice on. I've found that a little of the vintace amber mixed with the dark brown (tobacco brown) will give curly maple a pleasant look. I'm not sure what the antique look you seek is but the amber may be your answer. You can dilute these stains a little more with water to lighten them. You can also take a damp rag and wipe the wood after it it stained to lighten it up. The liquid is highly concentrated so it won't take much to do it. If you mix them with water they will lift the grain some. You can wet the wood first with a damp rag and this will bring up the grain. After it dries you can sand it again. The stain can be applied with a rag. I've discovered that you can apply one coat of stain and let it dry. Then you can sand the entire piece with fine sandpaper (220 or so). Then you can apply another coat of stain. This double coat seems to enhance the curl in the maple. I'd probably not try to sand the stain before topcoating. You might run over it with some fine steel wool or real fine scotchbrite pad. It is so easy to sand through an area and not realize it until the finish is on. I like nitrocellulose lacquer (sprayed on) for my finish. You need to apply enough coats to ensure that you won't sand through on your first sanding. After your first finishing you can sand the finish with something like 180 or 220 dry sandpaper. If you should sand through, you can take your stain and go over the area and it will not show after the finish is done. I'll usually put on several ( 8 to 12) coats of lacquer the first time and several more the second time around. There is a balance between putting enough finish on to be smooth and getting too much finish built up. Each coat of finish is adding weight and too thick a finish will have a tendency to crack over time. How much you thin the lacquer is also a factor. If you use some other finish this technique may or may not work. There are a lot of new products out there. I have not tried many of them. I'm sure there are some water-borne finishes that can be used but I'm not familiar with them at this point. There are other ways to accomplish this but this is one that I have tried and proven to myself. Some of these stains can be mixed with the finish but I haven't tried this. Parhaps someone else has some ideas for alternative ways. Just be sure to do your practicing on some scrap and save your project for the real thing. I hope your project goes well.
Ronnie Nichols
-
Permalink Reply by Fabio Pollero on
-
I'm about to start finishing a curly maple neck and resonator as well, parts supplied by Stewart Mcdonalds.
For the building of the banjo I've purchased the Siminoff book which is very helpful and gave me a clear idea on how to obtain the maximum contrast effect on curly maple wood.
Curly maple has a nice wavy fiber pattern which is occasionally cut in straight or flat shape pieces such necks or resonators. The perpendicular 'tiger-like' stripes you might see on the back of yor parts are the spots where those fibers has been cut. They are supposed to be sunken by the stain way much more than the surrounding areas where the wood grain still is compact. Siminoff suggest to stain with multiple passes, rubbing immediately after with a rag dampen with alcohol. This will allow the stripes to darken whilst the other areas are left less tinted, giving to the neck or resonator, deeper contrast after a few applications. This process is intended to be made od raw, unfinished wood, sanded with 320 grit paper and before the first staining, damped with alcohol or naphta to raise the grain allowing the stain to be better sunken. Sealers like schellack, sand & sealer, gun stock tung or tru-oil to be applied only after the staining of your like is obtained.
Hope this can help, at least it worked on my first banjo. I'm NOT a professional luthier, just an amateur builder, YMMV, of course.
Fabio
Italy
-
-
Probably apply a water base stain directly to the wood before applying finish may give the look you want. There are a number of stains or combination of, but vintage amber stain will maybe give the look you are after.
This is something I'd just experiment with on a scrap piece of curly maple that is sanded to the same degree as the banjo.
You can also add alcohol base stains to lacquer or shellac too. Attached is a picture of a uke I built with vintage amber added to Lacquer. Looks a bit more golden color than the picture shows.
Stains I used were purchased from Stew Mac.
Jim
-
Permalink Reply by danove on
-
For a very beautiful finish you should consider french polishing and
start of with a clear bright orange to yellow layer and work outwards
adding more and more darker stain to the pad, until you finish of to taste,
maybe with a dark brown upon a few turns redish stain.
This gives an unbeatable "deep" finish.
It is also easy to give it some sunburst.
Traditional oil sealer needs several months to oxidize sufficiently,
as dryers often add color, but Ronnie got some fine suggestions
here, that might highlight the structure of the maple.
-
Permalink Reply by Russell Vance on
-
Hi crew,
Ronnie Nichols is on the money here - The Stew Mac Liquid Dyes are the industry standard for achieving 'the look' - the analine dyes they replaced were the go for quite a time and are still used widely and effectively - the new dyes are more user friendly and mix with both water and lacquer/thinners (if you mix them and apply them with thinners they are NGR -non grain raising) - to get the figure to really pop/contrast I raise the grain a few times - knock it down lightly and them use hot water to do a final grain raise and open up the curly stuff. I then put on a concentrated stain coat liberally applied, wait for it to dry and then resand the whole lot almost back to the original wood - it looks like the stain has gone but it still lurks in the figure and then give it a final stain and start the lacquer build and the figure starts to contrast well.
I use the shader coats to apply accent if I need a honey/vintage sunburst or other bursts and finish the lot with a large number of thin coats (all nitro). A large number of thin coats will resist cracking which is often caused by well meaning souls applying thick 'floating' coats of lacquer which subsequently dry/cure with a tension gradient across the thickness which lets go under temperature stress. Another tip when applying sunbursts is to separate the burst layers with a coat of clear nitro - ie: burst shade, clear lacquer, next burst shade, - when it all settles the sunburst appears to float off the top of the guitar and gives a perception of depth to the finish - it also provides a isolation layer if you need to sand of a badly applied burst pattern. Have some fun, this is a part of making I really enjoy.
Rusty.
-
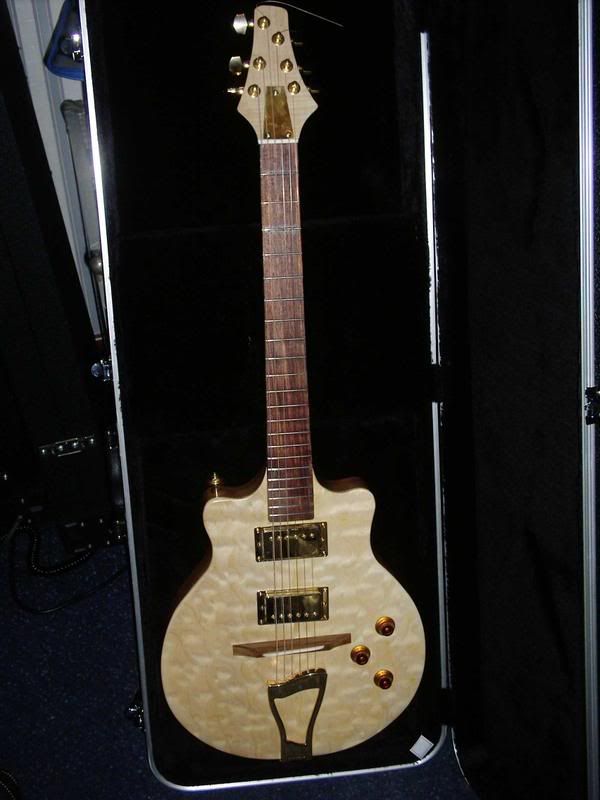
Permalink Reply by Martin Edwards on
-
here's my maple topped doublecut electric.
http://i42.photobucket.com/albums/e328/gowanedwards/doublecut/40600...
to accentuate the grain i followed this guys advice on youtube......
http://uk.youtube.com/watch?v=yx8mp3Ag36s
-
-
Im having difficulty with the link you might have to manually input but this is one of mine finished with stewmac vintage amber and nitro:
http://i476.photobucket.com/albums/rr124/vancegit/waynewithers.jpg
© 2026 Created by Frank Ford.
Powered by
![]()