Nut compensation
This is the last installment of my trilogy containing the "composite saddle bone", the "spruce bridge plate" and now the "nut compensation". These three things works in harmony on my restored old guitars and to my ears gives them a way better sound than expected :-)
Intonation is a field with many theories and opinions. Here I describe a practical way to use the nut and not just the saddle to improve intonation on any fretted instrument. The information found in the site setitupbetter.com is the base for the method.
To use the nut for intonation purposes gives the possibility to have almost "perfect" intonation on two different spots on the fretboard. With standard intonation the intonation will be great at the 12'th fret only. The intonation in the upper fret area of the fretboard are really bad indeed. Incidentally, that's where the majority of all guitar players play their chords ;-)
The main problem is that all fretted notes have a higher pitch than the open strings due to the stretching of the fretted strings. Another major problem is the need to have the nut a bit higher to avoid fret buzz from open strings (they are longer, vibrates more and are often played harder than fretted notes, back buzz behind a capo is another problem). Chords with a blend of fretted notes and open strings will sound out of tune with the standard intonation, especially the chords taken near the nut.
After reading the info on the site mentioned above, I came up with a way to measure the intonation points in the nut and the saddle. Using the measures I then cut the fingerboard shorter (around 1 mm shorter) at the nut and use a dremel and files to shape the nut and saddle so the string leaves the nut/saddle at the measured intonation points.
I use a stroboscope tuner and use it to make sure that the open string, the fretted third and 12'th notes on each string is in tune. I do this by moving the intonation points at the nut and saddle to a forth (retuning after every movement) until the equation is solved and all the three notes on the string is in tune. The positions are measured and written down.
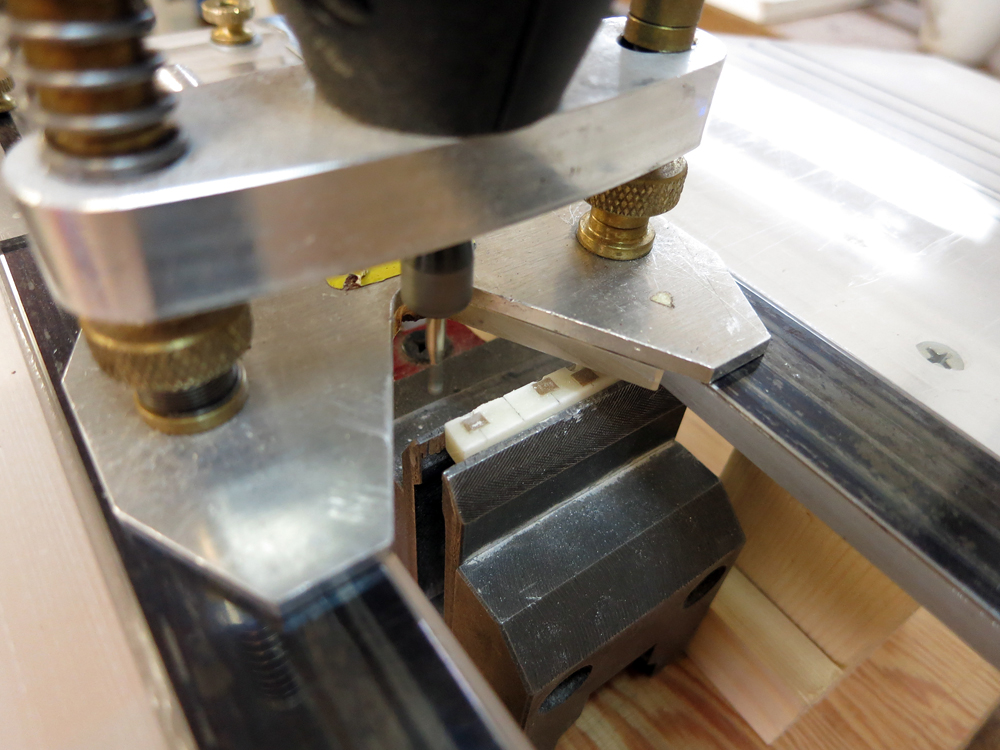
While measuring, the "nut" consists of small bits of tangless frets acting as an adjustable "zero fret" and the "saddle" is the back ends of drills rolling on top of the bridge. A temporary tailpiece is used to fasten the strings. A small piece of spruce is used to make the fretboard a bit longer at the nut to make room for the movable frets, a 0.15 mm feeler gauge gives the "nut" a bit more height to emulate the optimal string height at the 1'th fret. Another piece of spruce is needed to fill out the saddle slot if there is one.
 It's easier on an electric guitar, no need for a tailpiece and drills.
The final intonation points on the electric guitar above. Small compensations on the nut was needed on this one, but I had to extend the width of the nut about 1 mm closer to the 1'th fret.
I measure the distance from the back side of the 1'th fret to the middle of the "zero" fret for each string with a digital caliper and the distance from the same backside of the 1'th fret to the intonations point at the saddle with a ruler. I put the measurements in a table (mm and cm).
It's important to check the string height at the 12'th fret, it shall be the one used when playing. For the electric guitar I use a standard 2,5/1,5 mm between the top of the fret to the underside of the string. Having the stringset that the player likes and will use is another good thing to make the intonation as good as possible. The tuning shall be the one most used when playing. The fretboard should have the right relief too. In a nutshell, all the setups and choices should be done before the measuring for intonation.
By cutting the fretboard shorter at the position for the intonation point closest to the 1'th fret, the nut can be rectangular and all the other intonation points can be reached with a dremel. The nut looked like this when cut. Only with a close inspection of the nut you will notice the jagged cuts.
Not a great example, the G and D came close and I decided to leave both of them uncut when measuring the nut blank on the guitar... I should have cut in 0.16 mm on the G string...
Every guitar have small variations of the intonation points. There is no "one size fits all".
On acoustic guitars I have noticed though that it's the A or b strings that usually comes closest to the 1'th fret. At the saddle the strings G-e is often a straight line and the E-D strings can vary a lot. The electric guitar example above is not typical, the variations at the nut is usually bigger.
I made a special tool to shuffle the fret bits at the nut like this.
 I found a drill bit set with drills in steps of 0.1 mm between 6 mm to 0.1 mm. Very handy to adjust the string height at the 12'th fret with a radiused fretboard. I mark the position of the intonation point on the nut blank with small bits of tape to make it easier to cut in to the right spot.
 I made a jig for the Dremel using my modified version of the Stewmac saddle slot jig.

 Here is the finished nut, a rather typical one for an acoustic guitar.
 Doing a nut compensation like this makes the guitar chords near the nut play beautifully in tune. I believe that even a capo will play better since the saddle is only intonated for fretted notes (as the capo is) instead of a blend of fretted notes and the problems at the nut!
Without a nut compensation, every fretted instrument WILL be out of tune when playing chords near the nut. The difference is is a major one.
The nut intonations is quite stable. The intonation is very good even when a different set of string gauges or alternative tunings are used. I for one is not as sensitive to pitch as the stroboscope tuner is! On an electric guitar it's always a good thing to intonate the "good old way" for the new set of strings, that will make the guitar play cleaner in the lower part of the fretboard. There are always variations between different sets of the same string brand, but most of the time the difference is small.
The measuring process usually take me one hour. Making the compensated nut and composite saddle another couple of hours. All in all, it's about a half a days work if nothing goes wrong. The upside is the result obviously, but the measurements also makes it impossible to cut the saddle slot in the wrong position :-)
Views: 12438
Replies to This Discussion
-
Permalink Reply by Roger Häggström on
-
Yes. The compensation at the nut changes the intonation mostly for the upper part of the fretboard. The intonation at the saddle mostly the bottom part. That's the feeling I get when doing this,
-
Permalink Reply by steven gallagher on
-
So why did you CNC a fixed radius sanding beam? Can't you can buy those much cheaper than having one custom-made?
I've never gotten an actual quote, but figured it would cost a few hundred dollars to have someone CNC a compound radius beam.
-
-
I have never seen such a beam for sale.
The 0.1 mm relief is almost impossible to see with the naked eyes, but on a piece of flat glass and pressing on one end the other end comes up 0.2 mm :-) My pal Per Marklund (who makes world class 1930'ies Martin replicas!) helped me out with his state-of-the-art CNC.
-
-
Just a few last notes in this dying thread.
Even with a very low nut and a perfect setup, a nut compensation using the method I showed WILL improve intonation. Setting the intonation points in both ends gives a pretty firm shape to the intonation of the nut within the normal range of 1th fret and 12th fret action, from low to high.
I've learned to handle the 1th fret action much better after my experiments and the help from the kind folks in this forum. My setups and intonation efforts will be even better after this :-)
Beware of faulty strings when doing the intonation. When doing the last one I had a faulty E string, that's two in a row!
To summarize: There will never be perfect intonation on the guitar, but the standard intonation can certainly be improved using the nut and not only the saddle. To my ears the improvement is huge, especially in the upper part of the fretboard and for the standard chords with open strings.
-
Permalink Reply by Fred Gosbee on
-
I play a double-strung guitar (12 or 14 string) and have used nut compensation to keep in better tune when going from capo to open strings. The math is well-documented in luthier guild articles, but there is a practical way to accomplish nut compensation without a degree in mathematics.
1. With a capo on the second fret adjust intonation at the 14th fret using saddle compensation.
2. Remove the capo AND WITHOUT RETUNING use short pieces of fret to find compensation at the nut (nut to 12th fret).
3. Attach your compensation. I use short pieces of fret with the tang filed off and super glue in place.
It's a bit tricky with a double strung because the octave strings don't require as much compensation as the low strings. Getting the short frets adjusted so that the octave strings don't buzz is key. On my 12 string, which is tuned down 2 frets and is in drop D 99% of the time, the compensation on the 11th string is almost 3/8 inch, so don't be shy!
- ‹ Previous
- 1
- …
- 4
- 5
- 6
- Next ›
© 2026 Created by Frank Ford.
Powered by
![]()