Vertical Sliding Dovetail / Locking Dado Neck Reset - How to keep joint and change angle?
This is my first post/discussion. I'm a new player and fixer-hobbyist who's trying to resuscitate a '70s Conn Student-grade Martin knock-off OM that may have been made by Matsomoku. I'm looking for some guidance here as the next step after not getting much response to the query at AGF http://www.acousticguitarforum.com/forums/showthread.php?t=484657
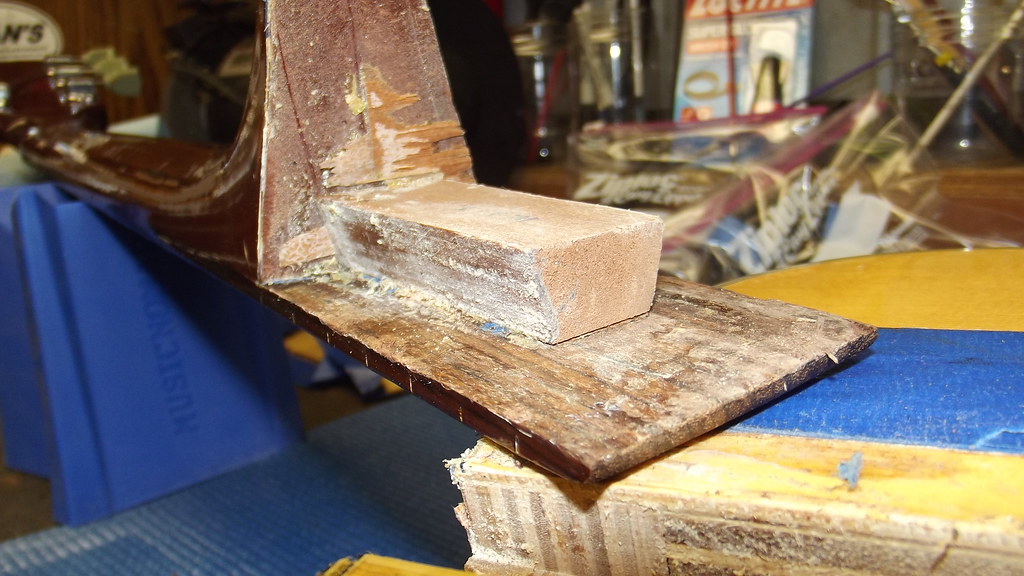
Neck is off and joint is not the doweled butt joint I expected but a sliding dovetail (or locking dado). Pics -
[IMG]https://c1.staticflickr.com/5/4463/37173411160_5a3e425eb3_b.jpg[/IMG]
[IMG]https://c1.staticflickr.com/5/4408/37383421896_df18fecaaa_b.jpg[/IMG]
My goal is to reduce the heel for proper neck angle and leave the dovetail in place while adding a bolt-on conversion for ease of future work. There is already a factory installed bolt at the heel's bottom that they used to hold the heel in place while the glue dried, so with the kit, there'd be 3 bolts total.
My question at this point:
1. How best to modify the tail and/or socket so that they allow the neck to be pulled back once the heel's reduced, while maintaining the design's integrity? So far as I can tell, the tail's part of the neck (true?), so it will not permit the neck to be pulled back without excess tension on everything, and I don't want to force/stress it.
To allow the neck to angle back, it would seem necessary to cut a slot at the top (neck side) of the tail down to the fretboard's bottom that would effectively severe the tail from the neck, but there's got to be a more pro way to handle this issue.
Alternatively, it might work to reduce the thickness of the wide part of the neck-end of the tail by some amount, with a gradual tapering of the reduction to zero at some point on the tail as it approaches the soundhole end. That should allow the neck to rotate back a bit. I can't tell if material would also need to be removed from the slot to allow the needed forward movement of the tail's bottom to avoid stress on the joint from the rotation. The joint would necessarily be a looser fit after that adjustment. Also, modifying the tail to allow the neck to rotate back might mean the fretboard extension rotates up, leading to tension when I try to glue it down.
I don't want to change the scale in any way, or impact the neck alignment the dovetail provides. I can't find anything online about resetting this neck joint, which suggests it wasn't intended to be reset - challenge accepted.
Is there a better way to reset this neck? Am I on the right track? Has anyone here reset a neck with one of these joints? The pictures I find online showing this joint are the ones I posted.
Thanks for any guidance.
Views: 1139
Replies to This Discussion
-
Permalink Reply by Hesh Breakstone on
-
Hi Chris. Frequently I find myself respectfully suggesting to folks in situations such as yours that the ax was not intended to have a serviceable neck joint or, in other words be reset in time as need be. With these potential projects any experience gained is useless IME because no one is ever going to pay an appropriate rate.... to have one of these reset.
I know what I would do if I wanted to reset it anyway but you nixed that by specifically writing that you don't want to mess with the alignment provided by the dovetail. That's exactly what I would do, slice off the dove tail, use it to fill in the matching slot on the top and convert the thing to a butt joint, two bolt bolt-on. Keeping the dovetail tenon attached to the neck shaft and fret board extension will actually resist the pulling that you need the bolts to do to change the neck angle after relieving neck cheek material for the proper neck angle.
It's a lousy design and likely intended to avoid any semi-skilled labor at the f*ctory required to properly set a neck angle and left/right alignment. For serviceability if gets an F though.
This can be done, resetting this but IMO the tenon needs to be sliced off and relocated as a plug of sorts on the top.
For anyone else who fancies getting reset experience that will translate into either learned, useful skills or $$$ get an old Harmony off eBay they had proper dovetails and the methods required to reset translate to Martins and any proper dovetail guitar.
-
Permalink Reply by Chris N on
-
Hesh,
Thanks for the reply. I get that it wasn't designed for repeated maintenance. I just hate to give up on original design (even poor design, if, as here, it serves other purposes) without a fight.
It sounds like you're saying the tenon is a structural part of the neck shaft, which was what I feared because it confirms that the joint, unmodified, will create excess resistance once attached following heel adjustment.
I've seen skilled woodworkers do work I didn't think possible, so what I'd hoped to hear was some little-known woodworker method for shaving/cutting or otherwise modifying the tail/socket to allow some room for the neck to be pulled back without resistance from the joint, thereby allowing me to keep the dovetail for sonic/structural/alignment. I know Jeffrey Suits (here and AGF) reset one of these joints a few years ago (he does a lot of saw-off resets, but he actually pulled the neck on a Conn dread) and I wrote him via AGF to see if he managed to keep the joint, or did as you're suggesting, but I've not heard back yet.
I'll give the inquiry a little more time and, if nobody disagrees with your prognosis, I'll likely follow your guidance. The goal is simply to have this guitar up and going, so I'll do what it takes, even if it hurts to kill the joint. Another option is to take what I need from the heel and see if the added resistance (joint uncut) is enough to worry about.
If I cut the tail, I'd like to at least maintain the left/right alignment, even as the bolts wear their holes a bit larger, over time so I also thought about cutting the tail at the neck (to relieve the resistance), while leaving the remainder glued to the fretboard bottom as a stabilizer. I lose any sonic benefit, but that looks like the only downside. This idea is at odds with your "use it as a plug" suggestion, so I'd appreciate any additional input you had on this. Perhaps a couple of unglued dowels to keep things lined up, with the understanding their neck holes may have to be adjusted for additional angle over time??
Thanks again for the reply, Hesh. I'm learning and having fun from the experience.
-
Permalink Reply by Thomas James on
-
Chris, you may be over thinking this. Hesh's suggestions are sound. This is an unusual joint set-up on an inexpensive guitar. Simply fill in / remove
the original system, set the neck, convert to bolts. Done and move on. That would be my course of action. Working with standard dovetail joint will be more instructive.
btw, All that blue tape seems overkill.
-
-
Your points are well-taken re: the reset and I'm moving in that direction.
Re: Tape - In addition to preventing tool damage to the top, the low-tack blue tape was used to insulate the top/finish, and to provide support for the foil-covered cardboard that provided more insulation and kept the laminate from coming loose due to the use of hot water bags used to remove the neck. I'd read the neck was likely epoxied and that it took upwards of 200 deg to loosen epoxy, so I was concerned the applied heat would loosen the joints holding the lam sides and heel block together. I'm not in a position to put that kind of thing back together if the wheels came off.
While the guitar's interior shows clear epoxy was used in that assembly, the neck and FB extension were held on with some kind of yellow glue, which was nice to see. It came apart fairly easily, but I'm still glad I used excess insulation, just in case.
-
-
I've finished the project to my satisfaction. In the event you can access this album, you'll see the photos showing what I did. www.flickr.com/photos/154247817@N03/albums/72157687328187264
I wanted to keep the tenon to preserve scale/intonation, fretboard alignment, structural stability, sonic integrity, etc., and maybe prevent having to glue the extension down. At the same time, I was going to take a fair amount off the heel, and I didn't want to have the full tenon adding unnecessary resistance and stress to that dovetail joint. So, rather than chop off the tenon and just bolt on the neck, I used a hacksaw to cut 2/3 of the way through the tenon to give it some room to bend back with less stress.
I had a nice bolt kit from LMI (though the bolts provided were 1/4" too short, necessitating a run to the store) that provided for 2 bolts/inserts, but I elected to not overstress that aged and dried out heel by putting a bolt/insert in place of the existing factory bolt/nut arrangement and instead added just 1 new bolt/insert in the middle. That, plus the rear bolt, and in combination with the intact front tenon, makes for a very strong connection that, when strung to tension, holds down the fretboard extension nicely, without glue (and no 14th fret hump). I oversized the hole for the insert and Titebonded it into place, an alternative installation suggested by LMI to avoid cracking the heel by forcing threads into the old wood, and it seems to be holding fine. So now it's a 2-bolt and 1 sliding dovetail neck that quickly and easily removes for further adjustments, or for travel.
I still have to intonate the B string a bit, but the rest are fine as is. I purposely overset it a smidge so I could get to my preferred 4/64 and 3/64 while maintaining a .150" saddle height, but there's no buzzing anywhere, even with almost zero relief. It may not look like much, and I did chip the heel finish at the edge during the reduction, but this 40+ year old Martin OM knockoff from Japan plays beautifully and sounds great, to me.
I'm pleased with the way it turned out, and with the learning experience the project provided. Thanks to all for the input that helped me get there.
-
-
And I enjoyed every minute of the fight! Very satisfying to take action and have it work out. A year ago I knew almost nothing about guitars, never mind working on them. I've learned a lot on here and on AGF - otherwise, I wouldn't have been comfortable tackling the job.
-
Permalink Reply by Jeffrey L. Suits on
-
Well, now there's two of us!
-
-
Wow!!!! (all the photos), and you've given me a plan for my own Conn. It's a 1976 F27 Martin D-35 knock-off I purchased in that year from Sherman Clay.
It's been in its case, for the most part, all these years until I got serious about learning to play guitar at age 69. It had a high action when I got it and it killed my fingers. A few years ago I shaved the bottom of the saddle, but it really needs a neck reset. Now that I've seen enough photos on the internet, I feel confident enough to tackle it.
It's a beautiful guitar and almost flawless, but not worth much without a reset. But the sentimental value is high. I bought a new Seagull S6 original and love it, but would like to see if I can give the Conn a new life.
Thanks,
Mike
-
-
Mike,
6 years on from the reset I described above, the guitar remains perfect. Action hasn't budged. Not gluing the fretboard end didn't seem to hurt anything (but I'd probably glue it next time, so the sound board carried some of the neck load, but still, nothing's moved, so who knows?). No fret buzz. I've got other guitars, but the Conn was lightly built and resonates well. I should note that I'd previously added a JLD Bridge Doctor to reduce the belly that a light build can produce and the belly remains flat, while sounding great. I've got a nice Taylor I'd sell before I sold the Conn. I expect your Conn Martin dread knockoff will be well worth your time/effort, and you'll learn a bunch, too.
As for your shimming question - I took material away from the heel bottom (where the heel meets the guitar top), so no shimming involved. I removed material there, then notched the tenon to allow the neck to come back a bit while remaining largely intact. I may have misunderstood your question re: shimming, however.
While not due for a reset yet, your post-2005 Seagull has a service-unfriendly neck joint. Prior to 2005, they were a bolt-on neck w/glued fingerboard - easy/peasy reset. I'm betting your Conn will sound better.
Best of luck with the project!
Chris
-
-
Thanks for your thoughtful response, Chris. I've done some refurbishment on a 1977 Suzuki F120 12 string, including a bridge backup plate out of maple and it turned out well. But I was wary of resetting the Conn because a reset is a bigger project and the neck joint was a mystery until now. I have a JLD Bridge Doctor I got for an 80s Alvarez 12 string, and it really needs it. But the Conn soundboard still looks flat.
Congratulations on your successful reset, and it's good to know the Conn was worth the effort. I've read a lot of good comments about them online. I'm looking forward to having mine easier to play and comparing the Conn to the Seagull.
Mike
-
-
While it's likely your dread has the same neck joint (Conn I think used different Japanese factories at various points in time, and your dread is technically a different animal from my OM, so who knows), I'm not sure that's guaranteed to be the case, so proceed slowly.
Following my loosening of the fretboard extension, I protected the laminated body around the neck, soundboard, and body top with foil-covered cardboard as shown in the pics in hopes that material would absorb the heat I was applying to the fretboard. In addition to heating the fretboard (and, thereby, the joint/glue), and body top around the joint (bags of hot water), I believe I also used a heat gun on the heel, but now don't really recall. In every case, though, I didn't hold the gun any particular place for "too long" for fear of loosening heel pieces, scorching wood, etc. This was a fairly laborious and time consuming process, but I went slowly because I had no idea what the joint looked like, so I didn't know what to push/pull/twist. Yours should go faster. I believe I secured the neck in a soft-jawed vise to hold the guitar while I pulled/twisted on the body. It took a while, but eventually things started to move, which was very satisfying. And, I didn't delaminate or otherwise hurt anything. Guess I'd rather be lucky than good!
I should note that I believe I did add some mahogany shim material to the guitar top under the heel due to a little tear-out when the joint let go, to build it back up. Could have skipped it, as the deficit wasn't much, but I had the material so went ahead. The tear-out was either inevitable due to the age/lamination, or I should have applied more heat to the heel/top area before separating (but I was nervous about overheating it).
My Conn remains a great (to me) guitar I have no intention of moving on.
© 2026 Created by Frank Ford.
Powered by
![]()