Ramping string slots
He says on that page:
http://www.frets.com/FretsPages/Luthier/Technique/Guitar/Bridges/St...
that it's OK to if necessary take the "ramp" right up to the saddle. Is there any downside to doing it that far? I don't actually need much of a ramp except on the 1st string and with the action as it is now (about 0.085" at the 12th fret) the ramp won't need to be that long. But if it's really no problem to extend the ramp right up to the saddle slot (on that one string) I can lowering it on down to 0.075"-0.080" or so and still have more break angle than is shown in his "After" photo.
I'm kind of eager to try this concept. The guitar sounds great and plays well except for needing the action about 0.010"-0.015" lower for comfort up above the 4th or 5th fret. These ramps sound like a magic bullet. I'm going to do as mentioned on that tutorial and just carefully route them out with a 1/16" Dremel bit, freehand. The guitar came from the (Chinese) factory with some small ramps for each string but they are very minimal and don't really lower the string's bend point but my a few thousandths at most.
Views: 3386
Replies to This Discussion
-
Permalink Reply by Paul Hostetter on
-
I think Frank alludes to it on his page, but the disadvantage of cutting the ramp right to the saddle is about compromising the structural integrity of the bridge if it eventually gets a decent neck reset. I think it may be more of a cosmetic issue. One would hope that a real neck reset would happen instead this little fix. Often people do these quick-and-dirty amendments and find out it still wasn't enough and end up resetting the neck. It's then that you confront the consequences of the ramps.
BTW, if you try this with a Dremel like Frank's photos, bear in mind that the whirling bit is quite inclined to jump out of the intended ramp position and dance across and decorate the top of the guitar. Hold on real, real tight, or mask the top. Or both.
You might want to reconsider your measurements, or at least where your decimal points are. .010" (ten thousandths) is the thickness of a very thin guitar string, and a change in action of that amount would be imperceptible.
-
Permalink Reply by Brent Hutto on
-
I think the experiment is complete. upon consideration of the potential for difficulty with the Dremel I went with a much more conservative (and slow) approach. I just used a pin vise to hold a 1/16" bit and then pressed it down into each ramp, firmly with my left hand. Spin the bit clockwise with the right hand and it does work its way down very gradually. Fortunately the 1st string ramp is the only one I really needed to l take (almost) to the saddle slot and the others I just deepened by roughly one string thickness.
You're probably right than 0.010" isn't much of a change so I went ahead and took the bass side down just a hair over 0.015" while leaving the treble end almost unchanged (maybe five thousandths off the saddle). After restringing and giving the truss rod a tweak I went from fairly high action to not quite as high...
BEFORE: 0.085" 1st string, 0.115" 6th string, zero relief at the 7th fret
AFTER: 0.085" 1st string, 0.100" 6th string, 0.003" relief at the 7th fret
...and small change or not the guitar feels better up at frets 6, 7, 8 and beyond. The break angle still isn't great on the high-E string but it's as good or better as in Frank's ramping illustration. This is about as far as it can go, there is now something in the neighborhood is 0.050" of saddle showing, give or take a bit depending on whether you measure on an end or in the middle. But the ramps have the point where each string departs the bridge pin "submerged" pretty well. I think mostly they let the windings on the strings get down under the surface of the bridge and that helps.
Of course in doing all my measurements I see that there a gap developing along the back edge of the bridge under the treble-side "wing". What a piece of junk, some Chinese factory was way early in the learning curve on this one. Sounds real good, though, at least until that bridge flies off one of these days.
-
Permalink Reply by Tim Mace on
-
I've been dremeling a scalloped ramp the width of the barrel sander for my bridges and seems to work great on wooden floaters. Assuming this is what you mean by ramping .. here's a picture of a mando bridge I'm referring to.
- Attachments:
-
-
 Picture 002.jpg, 66 KB
-
-
-
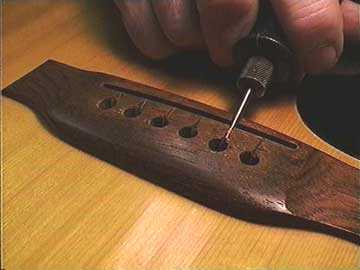
It's not the same thing at all. We're talking about guitar bridges here, and the litttle groove that clears the way for the string from the bridgepin hole toward the saddle. Check this photo:
-
Permalink Reply by Brent Hutto on
-
Compared to that picture, my 1st-string ramp is just about as shown but my others are all slightly shorter. Here's a very bad snapshot of my break angle.

-
-
A pitcher is worth a 1000 words ....my bad....glad I now know what ramping is.
-
Permalink Reply by Ron Frazier on
-
I use a Spiro bit that is a tapered bit for a router that is 1/8th inch size and the bit will not cut on the end so I hold the bit on the slope that I want and rest it against the pin hole-back and gently drop it straight down. Look at a new Martin bridge. The string dose not rest on the ramp but at the bottom in the pin hole and then the saddle. My understanding is the string angle from the saddle should be a certain amount to load the bridge for good sound. I do this on most older guitars that need the bridge lowered.
Ron
-
Permalink Reply by Jim Hester on
-
I'm thinking seriously about ramping my bridge because I took the saddle down so far that I hardly have any angle at all on the strings. I like the idea of the 1/16" dremel bit because it doesn't make such a rounded out look on the ramps. I'm wondering about the best way to mark where the ramps will be. I've thought of removing the saddle, taking string tension up, then either marking along each side of the string, or even using an exacto blade to make a shallow, angled cut along side of the strings to give the dremel bit a locator slot to start in. Any suggestions? Thanks. Jim
-
Permalink Reply by Mark McLean on
-
I've tried it with a Dremel but it made me feel very nervous, for the reason that Paul mentioned. One slip with that whirring bit close to your guitar top and it is going to end in tears, bad language, or both. I have now been using these little saws from Stew-Mac.
http://www.stewmac.com/shop/Tools/Saws/Bridge_Pin_Hole_Slotting_Saw...
They get the job done simply and with a good degree of precision and control. You can also make up a similar rig with a hacksaw or coping saw blade if you want to save a few bucks (Cumpiano has a description of this)
I also agree with the point that these ramps are a visual statement of "this guitar actually needs a neck reset but I went for a simple/cheap fix". In a cheap guitar that is a perfectly reasonable pragmatic decision. If it is a valuable instrument you should probably get her "fixed up properly"
Mark
-
Permalink Reply by John on
-
You can use a nut file to do this job or a small V groove chisel. You could plane down the top of the bridge.
-
-
John and Mark..........thanks for the great suggestions! Since I've had a lot of experience with power tools getting away from me, I like your ideas for a more controlled cut by using hand power. My kids have an old Hannah Montana guitar that I can experiment on. There's always the temptation to save money, but on something like this that you only have one shot at, I may as well buy the tools that I need to do it right. Thanks again. Jim
© 2025 Created by Frank Ford.
Powered by
![]()